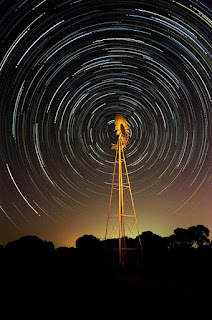
From the very first time I saw a star trail image, I knew that the challenge was for me. You have to be able to visualize your composition in pitch dark, do a lot of little simple things right without forgetting any of the steps, and hope that your camera performs the way you expect it to. I say hope, because once you push the shutter button, you are committed - you can't change on the fly like you can in many other forms of photography.
This style of photography can be beautiful, and extremely rewarding if you just do a little preparation ahead of your shoot. The following information represents the things that I do when I pursue star trails. It isn't a panacea, and it may not work for everyone. But if you choose to follow this methodology, I am pretty confident you will come back with something that will work for you.
Seriously, let me offer a couple of other things to think about for the next time you decide to give this a try:
1. Start by setting your camera up before you leave for the field - I do the following gross checklist before I get in to where I am going to be setting up - And I usually do it earlier in the evening, when I am more alert
b. Select the lens you are going to use.
c. Set your lens to manual focus
d. Set your shooting mode to manual, set shutter speed to bulb , Set your aperature to wide open - 1 stop.
e. Attach your remote shutter release/intervalometer to your camera. Set up your intervalometer for the exposure you plan on running your test exposure to.
f. Format your memory card
g. mount your camera on your tripod
h. If you are going to use a spirit level, mount it to your camera or tripod
i. Put a small flashlight in your pocket
You are ready to go to the field
2. Upon arriving at your shooting location
a. Walk around for a few minutes with all lights turned off. Allow your eyes to acclimate to the darkness. Determine what you believe you want your composition to be and where you will need to set up in order to achieve the desired comp. Think in three dimensions!!! (e.g. The composition above worked for me because I was able to get the spin of the stars around the tip of the windmill - to achieve that , I needed to lower the tripod in order to obscure Polaris from the shot)b. Set up your tripod. Set your focus to infinity on your lens - not all the way past infinity to the stops on the lens, but to the infinity mark, or wherever you think you have the clearest focus through the viewfinder (Use the small flashlight in your pocket now - it will be a big help!!!)
c. Take a test shot - On a moonless night, like last night, I start with a 3-5 minute exposure at F4. After the exposure is complete, review it on your LCD screen and determine if you are getting a light-enough image. If you feel like you need to adjust, do so and run another test to make sure you are in the ball park. Once you get an exposure you feel like you can work with, you are ready to run your series.
d. NOTE: From this point forward, life is easier if you are using an intervalometer, where you can program an exposure time and a number of images to be taken and then let the camera do it's thing. If you are doing this with just a remote shutter release and a stopwatch, then you have to stay awake - which is tough if you aren't a "night person". You want the exposure time for all of your images to be approximately the same length so that post processing and stacking of your images can be facilitated in a more consistent and easy manner.
Why multiple images? Most of our digital cameras begin introducing considerable amount of noise anytime you are looking at exposure times in excess of 1 minute. They also tend to lose the black color in the night sky after an extended period of exposure. My best results in this type of photography have come back with exposure times for individual images in the 3-5 minute range. So I tend to try and make that my base - I make all adjustments for local conditions off of that.At the end of the night's shooting, before you put your camera away, and before you turn it off, put the lens cap back on and take one last exposure at the exact same settings that the rest of the shots were taken at. This can be used to cancel out noise IF you have a major noise issue with your final stack. Do a search on "dark frame subtraction" and "potography" and you will find all kinds of references to how to use this exposure in your final processing.OK...now you have your exposures. The onlything left is your post processing to get your final image. My workflow looks something like this:1. Import raw files into Adobe Bridge. Do a bulk process on these files using Image Processor to create JPG files to be used in Image Stacker.2. Use Image Stacker Software (Image Stacker Software) to create the star trail stack. Use the "Brighten" blend mode.
3. Bring the finished stack into Photoshop for final touch-up and processing
4. Voila' OK...I admit it...After taking that long to type this up, it is pretty involved...but it isn't hard. You can do it. The next time you want to give it a try, drop me a line...If I can, I will be glad to tag along. Maybe we can put a small group together and give it a go. It is always more fun to have someone to talk to while the camera is doing it's thing.
Keep the faith.
HFM


cool stuff!!
ReplyDelete